TACTICS
GENERAL
For experienced players there is no particular advantage in being either White or Black, but the balance of power does shift in the course of the game and both sides need to bear this in mind.
In the first stage, when players are setting their pieces on the board, White has a definite advantage. Even if an outright win is not possible, White should make the most of this to keep Black on the run and set things up for the second stage.
In the transition from first to second stage, the advantage briefly goes to the side that still has pieces in hand to place on the board. For this reason, wholesale massacres of your opponent in the early stages need to be handled carefully, they tend to backfire at this point.
In the second stage, when both players' pieces are moving on the board, the underlying advantage passes to Black for a while. In the absence of any bold plan, White's best bet is to consolidate avenues to the circumference and avoid losing pieces.
Thereafter the balance of power steadily evens out and the initiative belongs to whoever is bold enough to seize it.
WHITE
The goal for White is the same as in Game One, but you will find a slightly different strategy required because now all Black's energy is focused on blocking you.
White's main aim should be to secure several lines across the third, fourth and fifth rings, because these are the easiest for Black to secure. Then the offensive can be switched from one line to another.
Towards the end of the first stage, White should check the safety of its pieces in the innermost ring. As soon as Black starts moving its pieces on the board it can use the Navel Stone to take them.
It is easier for White to win outright in the first stage, but an experienced Black player will find ways of preventing it. The first stage is then best used to set the scene for the second. With experienced and evenly matched players this game can last for several hours.
BLACK
Black's first aim should be to stop White establishing strong lines across the third, fourth and fifth rings. For new players this will seem a harder task than White's, and it is, but there are several standard moves which, once grasped, will nearly always ensure that the game goes through to the second stage. Then Black has the advantage for a while.
The first reward for Black on reaching the second stage is that it can use the Navel Stone to attack White's pieces in the first circle. If White has forgotten this (as often happens), the result can be devastating.
Then, if the inner and middle rings are reasonably secure, it is not a bad idea to set about just capturing as many stones as possible till some pattern emerges.
White usually recognizes defeat without having to be challenged. In cases of stubbornness Rule 6 can be invoked, but you must be very sure of what you are doing. The price of a failed challenge is usually victory for White.
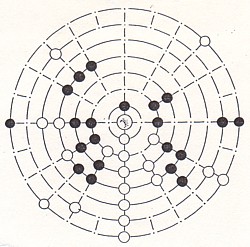
An example of a win by White in the second stage of Fidchell. The winning line is not often this straight and the course of the preceding game was more devious than the outcome suggests.
|
|
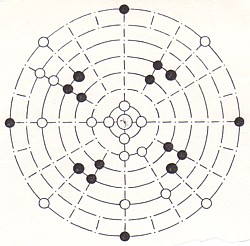
In this game White has carelessly let Black turn the third and fourth circles into complete no-go areas in only eight moves. In the second stage of the game this would be fatal for White. Coming at the beginning like this, however, it is merely a great inconvenience.
|
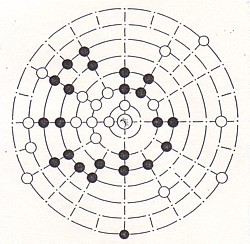
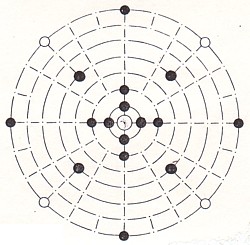
An example of a win for Black in the second stage of the game. Although White still has more than enough pieces on the board, Black has barricaded the centre with an impenetrable wall whose only gap is irrelevant.
Defeat often takes a while to dawn on White, leaving Black to decide when to challenge for a resignation. Caution is needed though, as a premature challenge can be disastrous.
A common mistake by Black at the end is forgetting that it needs at least one piece on the board which can be moved without danger or disruption to the barricade, even if it is only moved back and forth between two adjacent spaces.
|
|
One of the cheapest ways for Black to win is by capturing and securing the innermost circle. At the other extreme would be Black's complete occupation of the outer circle.
Neither is very likely in practice as Black's barricade is rarely more circular than White's radial lines are straight.
|
|